
The first thing you want to do is press the Add Images button. You will be presented with a dialog that will let you select your images. After you do this, the image list in the bottom middle of the window will populate with all your images. You can also add images by dragging them from the Finder into the image list.
When you click on one of these images in the image list, its picture will appear in the small preview area to the left of the image list, and the edit field to the right will allow you to enter a description for that image. You can rearrange images in the image list after you have added them simply by dragging them within the image list.
The Title edit field allows you to enter the title of the HTML document. Your HTML document will have this text for the title and as the heading.
To have PhotoPage automatically calculate the image paths to your images, select the Automatic radio button. Otherwise, to specify the image path to use, select the radio button beside the edit field. The Image Path edit field allows you to enter the path from the HTML document to your images. This is a unix style path, using forward slashes ('/') as the folder separation character. You may want to specify the image path yourself instead of letting PhotoPage calculate it when you are uploading your finished HTML file and images to a server and the relative paths on the server will be different than how it is on your local hard drive.
The Document Intro edit field allows you to enter an introduction for your page. This text appears vertbatim between the title header and the table of images and descriptions. This text is included vertbatim, so you can include HTML code.
The Footer edit field allows you to enter a trailer for your page. This text appears vertbatim between the table of images and descriptions and the end of the document. This text is included vertbatim, so you can include HTML code.
Press the Export to HTML button to show the standard file dialog and create the HTML file. If you have the Make Thumbnails checkbox set (in the Document Settings window), then thumbnails will also be made of all your files. An extension of "-tb" will be added to the end of the filename before the ".JPG" extension for all your thumbnail files.
Press the Preview button to see the resulting HTML file in your default browser. You can set your default browser in the Internet control panel or the Internet Config application. Netscape Navigator is my browser of choice.
Pressing one of the arrow buttons beside the Open in Window button will rotate your image in the direction shown in the button. This rotates in 90 degree increments. This is handy when you take a picture with your digital camera in "portrait" mode.
The Skip This Photo checkbox applies to the currently selected photo in the image list. When selected, this photo will not be included in the table of images in the HTML, and a thumbnail will not be created for it.
Pressing the Document Settings... button will reveal the Document Settings window. This window is where you can customize the appearance of your documents by specifying such things as fonts, colours, backgrounds, columns, and more.
When you first open the window, it looks like this:

There are a number of tabs at the top of the window that let you switch between General, Fonts, Background, and Descriptions. There are two buttons on the bottom of the window - Save these as default and Load from default. Pressing Save these as default will take all the values in all the panels of the Document Settings window and make them the default settings. This means the next time you create a PhotoPage document, it will have these settings to start with. If you change any of the settings in the Document Settings window, pressing Load from default will set all the settings in the Document Settings window to the values that you last saved using the Save these as default button, or to application defaults if you have never saved your settings to default before.
General
If you select the Ensure image extensions checkbox, when you export to HTML, PhotoPage will ensure that the filename of all of your images end with the string "JPG" or whatever you choose in the preferences for JPEG images, or with the string "GIF" for GIF images. This is important since if your images do not end with a proper JPEG or GIF extension, when a user tries to download the image, it may appear in their browser as raw text rather than as an image.
The Make Thumbnails checkbox turns on the thumbnail making feature. PhotoPage will take each image and make a thumbnail image using a constant width that you can specify in the Preferences section. A "-tb" will be added to the filename to differentiate between the original file and the thumbnail.
The Number of columns edit field lets you specify the number of columns for the image table. Specifying 1 column will result in output equal to what PhotoPage 1.0 produced. A column refers to an image description pair, so specifying one column actually produces one column for the image and one column for the description. Click here to see a sample with 2 columns.
The Table border width specifies the width of the lines that separate the cells in the image table. Specifying a width of 0 causes no separating line to be drawn, and produces tables equivalent to those of PhotoPage 1.0. Click here to see a sample with a table border width of 1.
Underneath each image, you can display the image file size, image dimensions, or the image filename. To turn each of these on and off, you can use the checkboxes Show Image Dimensions, Show Image Name, and Show Image File Size. Click here to see a sample with image names turned on.
Fonts
The fonts panel looks like this:

In the Fonts pane you can specify the font face, font size, and font colour for each of the title, heading, descriptions, and footer. From the Font pop-up menu you can select the font face - Times or Helvetica. From the Size pop-up menu, you can select the font size. Font sizes from 1 (the smallest) through 7 (the largest) are available. You can select font colours by clicking on the coloured squares in the Colour column. This brings up the Macintosh Color Picker where you can select a colour using a number of different pickers.
Background
The background panel looks like this:

The Background Image section allows you to choose the background image for your page. You can enter the full path to the background image by entering it in the edit field and selecting the radio button beside the edit field. Or, you can pick the image by pressing "Select..." button and selecting the radio button beside the background image name. When you have selected a background image this way, you can click the View button to take a look at the selected background image. Click here to see a sample with a background image.
You can also choose to show a background colour instead of a background image. Select the Use Background Colour radio button, and select a colour using the colour control (as in the Font panel).
Descriptions
The descriptions panel looks like this:
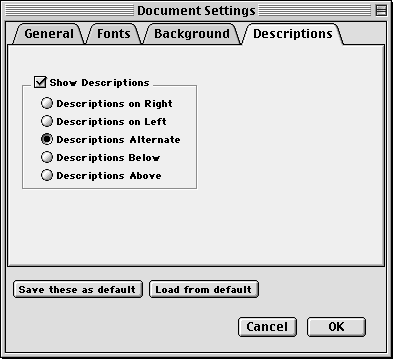
The Show Descriptions checkbox lets you turn on and off the descriptions. Turning off the descriptions produces what is sometimes referred to as a contact sheet - a table of just images. Click here to see a sample with no descriptions and 4 columns.
Five description location radio buttons - Descriptions on Right, Descriptions on Left, Descriptions Alternate, Descriptions Below, and Descriptions Above - specify which side of the images the descriptions are placed. Choosing Descriptions Alternate would place the descriptions on the right for the first row, on the left for the second row, and alternate like that thereon. Click here to see a sample with alternating description locations.
To quickly select the next or previous image in the image list, press command-down to select the next one, or command-up to select the previous one.
You can remove an image from the edit list by selecting the image to be removed and pressing command-delete.
You can rotate the image to the left by pressing command-left. You can rotate the image to the right by pressing command-right.
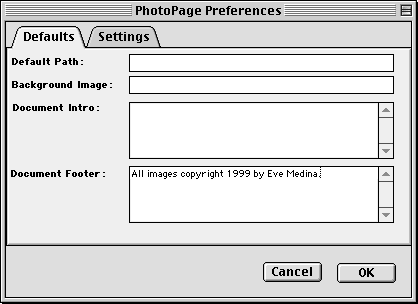
There are two tabs at the top of the window that let you switch between Defaults and Settings.
Defaults
The Default Path edit field specifies the default path to be placed in the Image Path edit field of a new PhotoPage document.
The Background Image edit field specifies the default image to be placed in the Background Image edit field of a a new PhotoPage document.
The Document Intro edit field specifies the HTML header to be placed in the Document Intro edit field of a new PhotoPage document.
The Document Footer edit field specifies the HTML footer to be placed in the Footer edit field of a new PhotoPage document.
Settings

The Thumbnails box lets you specify the size of thumbnails. The Size in pixels edit field lets you specify how many pixels to make the thumbnail. If you select the Width radio button, then the width of the thumbnails will be what you entered in the Size in pixels edit field and the height propotional. If you select the Height radio button, then the height of the thumbnails will be what you entered in the Size in pixels edit field and the width propotional. If you select the Longest Side radio button, then the width of your image is greater than its height, the width of the thumbnail will be what you entered in the Size in pixels edit field and the height propotional. Otherwise, the height of the thumbnail will be what you entered in the Size in pixels edit field and the width propotional. Picking Longest Side is useful when you have images in both landscape and portrait so all thumbnails appear the same size.
The Extensions box lets you specify the extensions to use for JPEG and GIF filenames. This is used both on the original images when Ensure image extensions is enabled and the thumbnail images with Make Thumbnails is enabled.
The Filetypes box lets you pick creator types to associate the HTML file and thumbnails with applications. You can type in the application's four character creator code, or you can press the Choose button to pick an application.
First, make sure that your background colour has sufficient contrast to your text colours. For example, it's really hard to read dark green text on a dark blue background. You should have your background be a light colour and your text be dark colours, or vice versa.
Second, there are certain colours that really don't look good together. Purple and pink. Red and yellow. Orange and blue.
Pages that look horrible reflect badly on the owner of the page, but even more important to me, they may reflect badly on PhotoPage. I scout the net now and then for pages made with PhotoPage, and if I find one that looks ugly, I'll add a link to it on my ridicule page until you fix it up.
No warranties are made neither expressed or implied that this software is suitable for your needs or will not damage your computer or data.
To find the latest version of PhotoPage, check VersionTracker.